Introduction
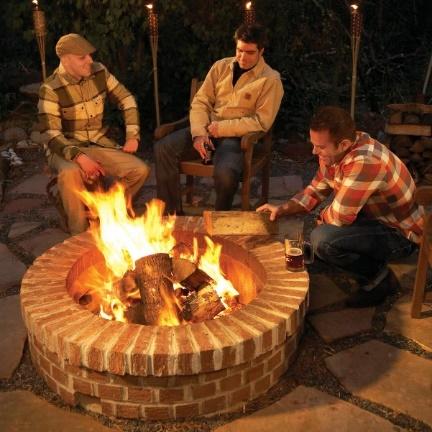
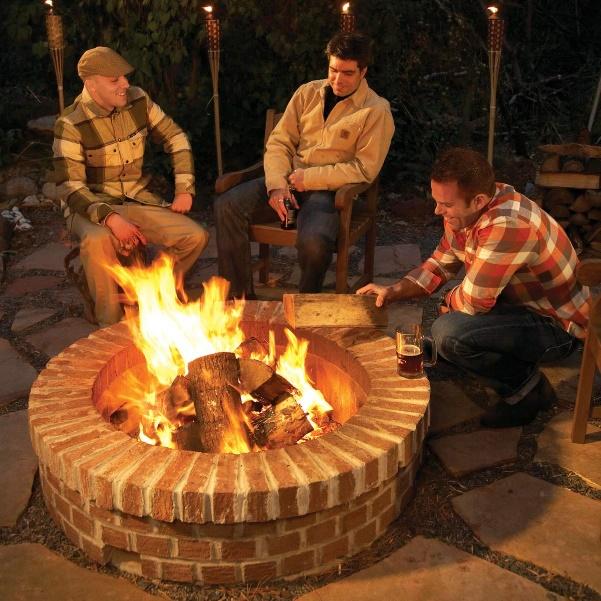
What is better than sitting around a crackling wood fire pit with your friends this winter?
Don’t have one? Not for long, we are going to teach you step by step how to build an in ground fire pit in your own backyard.
What you will need:
Tools:
- Brick hammer
- Bucket
- Concave jointer
- Concrete float
- Cordless drill
- Level
- Margin trowel
- Mason’s trowel
- Safety glasses
- Spade
- Tuckpointing tool
- Wheelbarrow
Materials:
- 120 face bricks
- 25 firebricks
- Can of spray-paint
- 92 cm (Length) 20cm (wide) cardboard concrete form
- 122 cm (Length) 20cm (wide) cardboard concrete form
- Five x 40kg bags of Type N mortar mix
- One 2 Litre bucket of refractory cement (sold at a brickyard)
- Ten x 40kg. bags of concrete mix
- Two x 3-meter lengths of 3/8-in. rebar
Overview: How to Build a Fire Pit
Getting Started on Building your Fire Pit
Fire pits have become very popular of late and it doesn’t take a rocket scientist to build one. Most importantly the fire pit must be solid, safe to use and last decades, so let’s do a good job😉
This project will only take a few days and as you follow the step by step instructions you will see why. The first step is pouring the footing and letting it set, then you will start mortaring the bricks into place.
Step 1
Remember!
Before Digging, make sure that you do not damage any underground electrical wires or water pipes.
Make sure that the location is not too close to buildings and overhanging trees. When the wind picks up, you do not want to burn anything down!
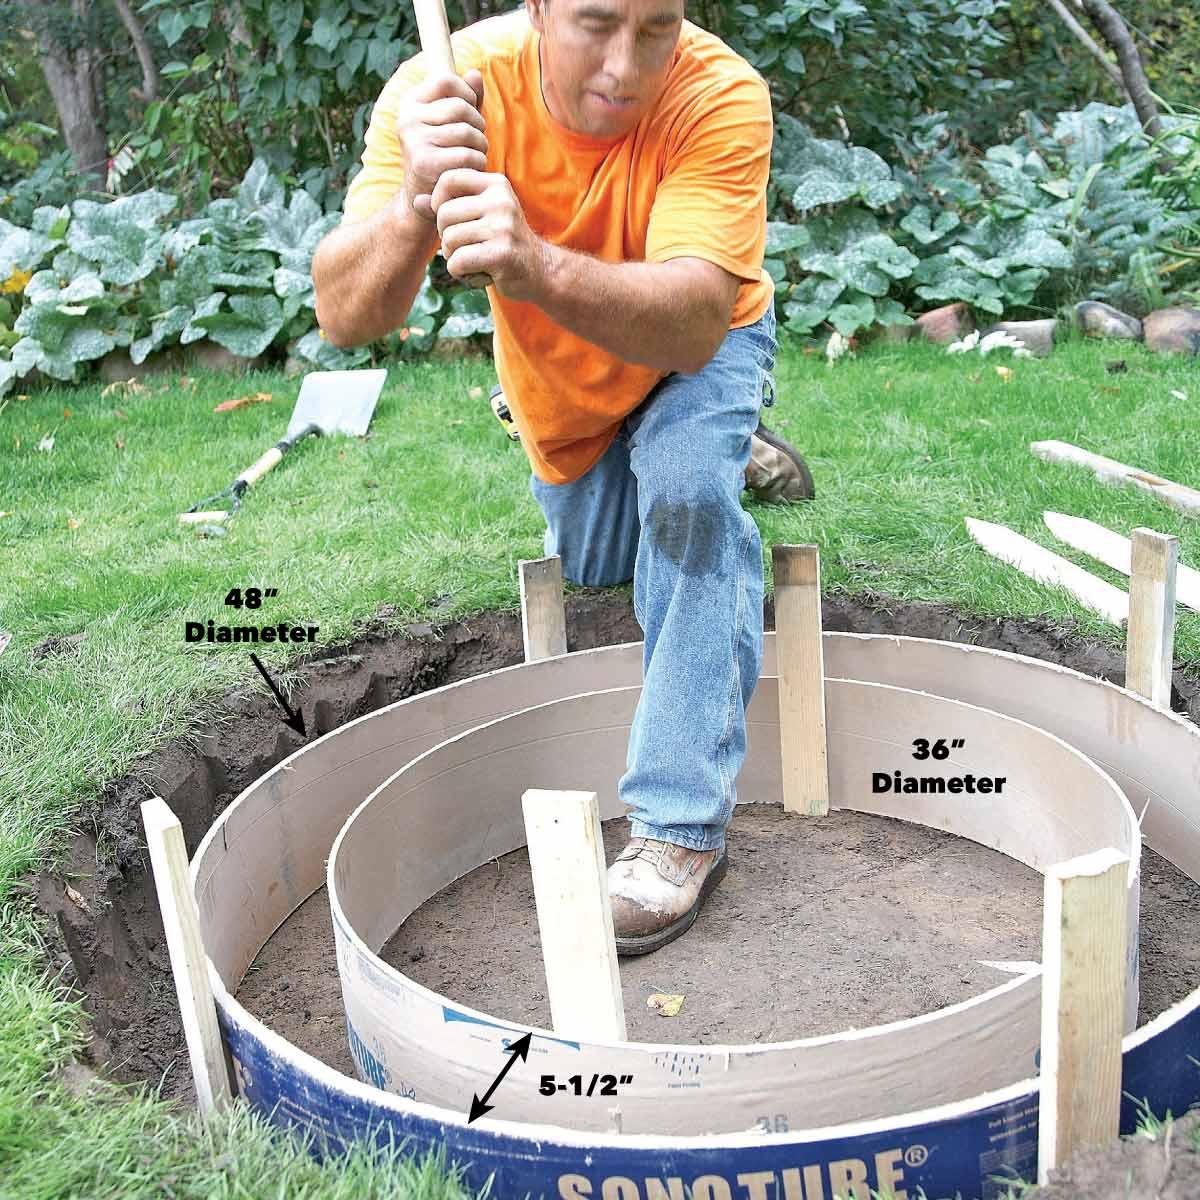
Step 2
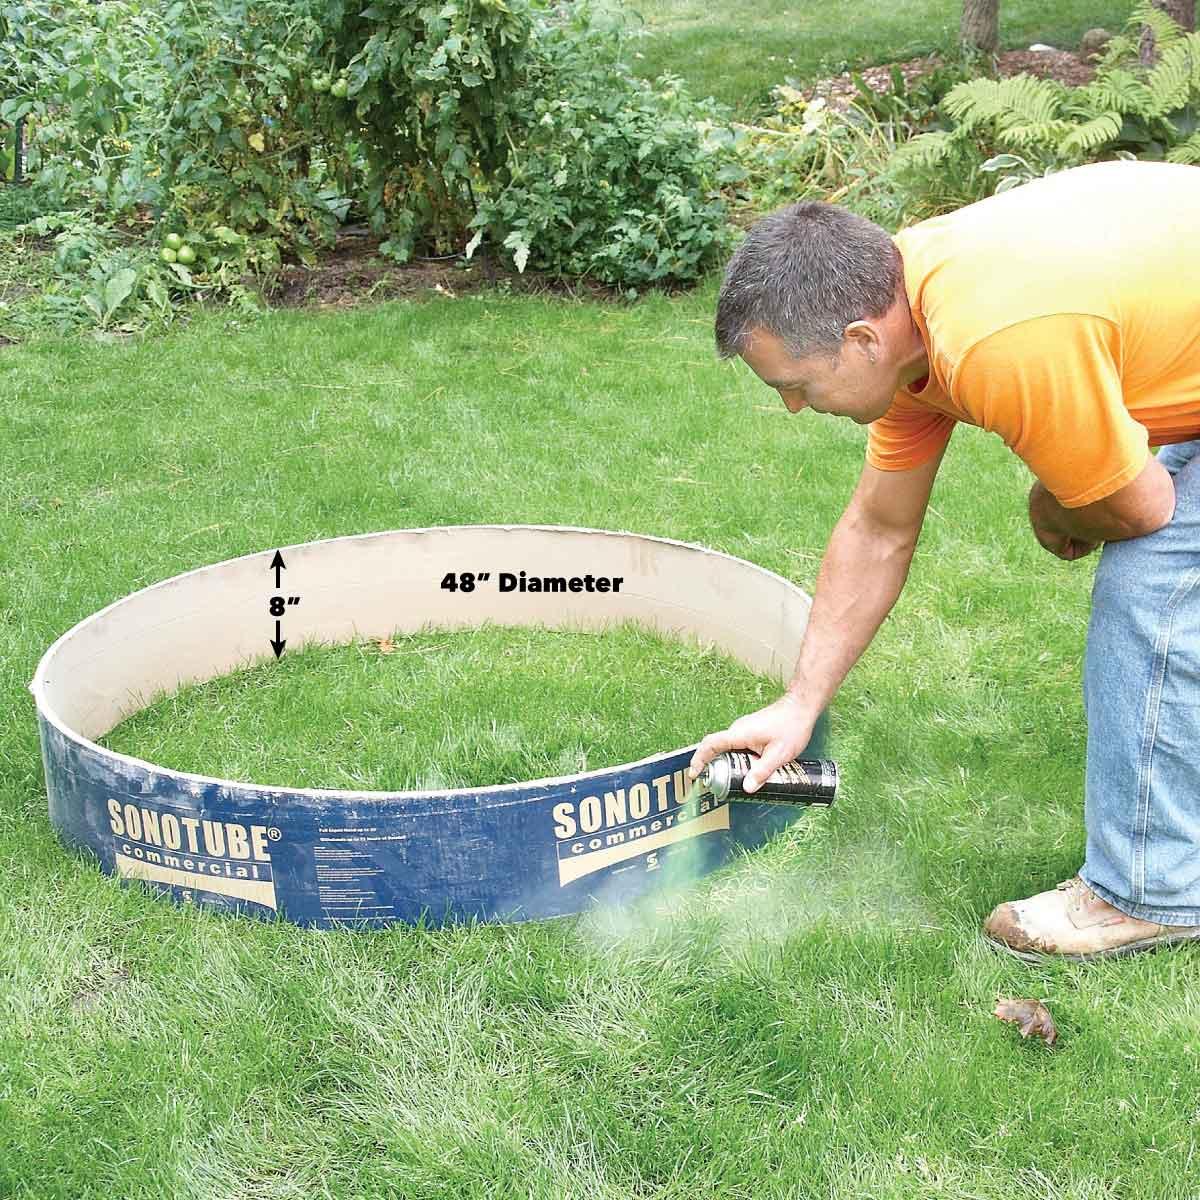
Mark Out the Fire Pit
Dig out a dedicated space in your yard for the fire pit base by following the dimensions below:
- A 92cm – diameter in ground fire pit creates enough room for a good fire while keeping everyone close enough to chat and be social.
- To make measuring the pit and pouring the concrete footing easy, we used two cardboard concrete form tubes (purchased from a concrete supply company).
- Carefully bend and screw the two ends together to create a 92cm – diameter circle and use the other to bend and make a 122cm – diameter circle.
- Set the larger form in position and spray paint around it. Dig a hole about 20cm deep and 8cm larger in diameter than the form.
Step 3
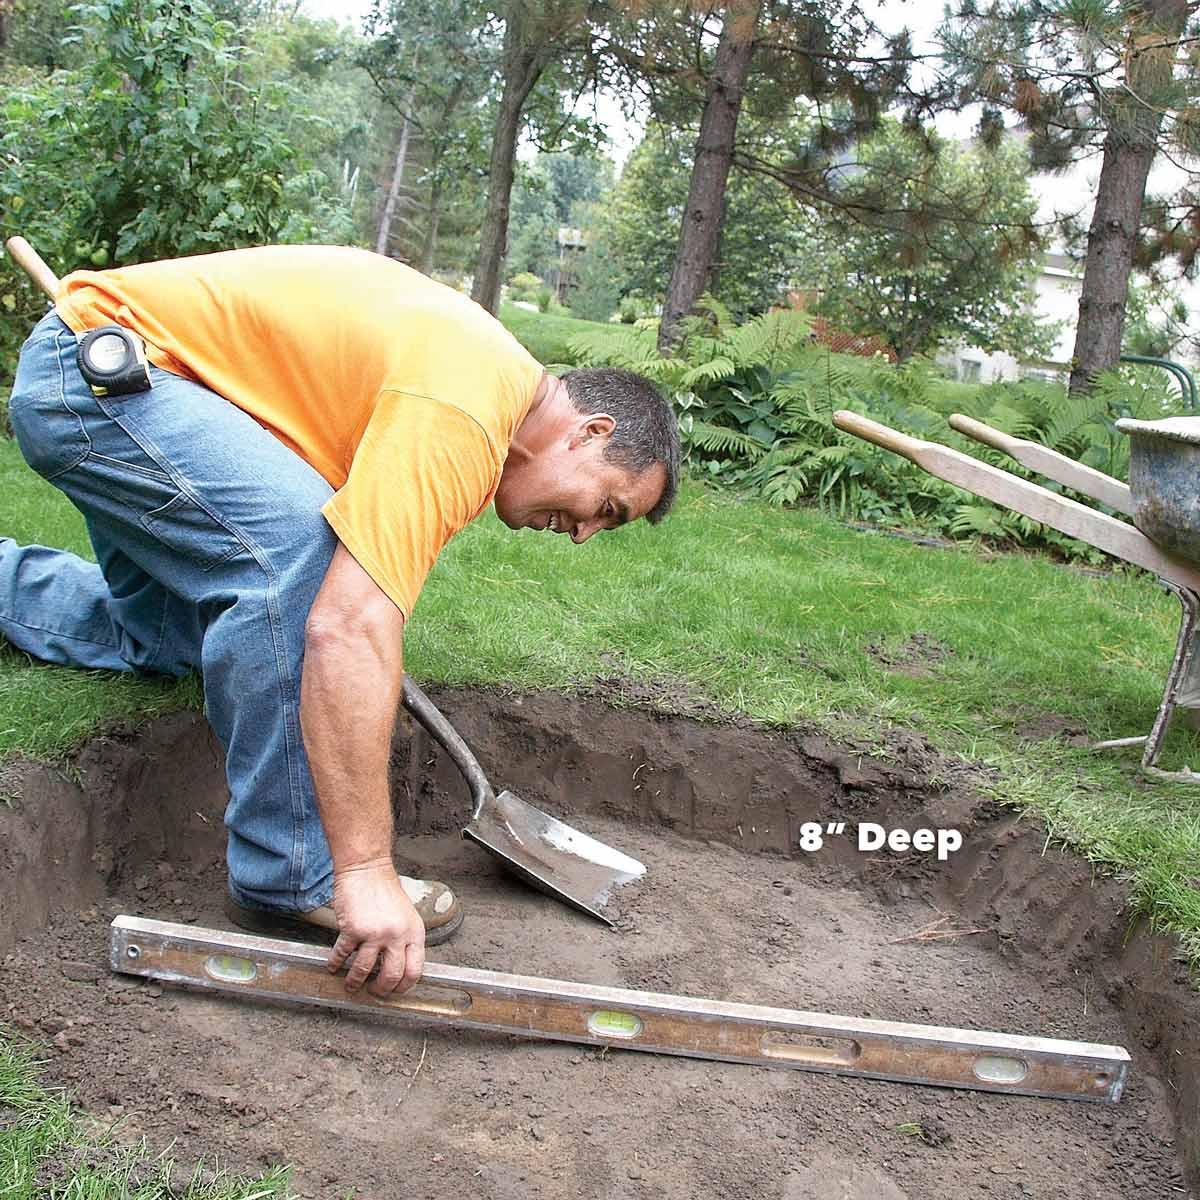
Level the Pit
- Dig the soil out about 20cm deep for your fire pit base and check that the bottom of the hole is level.
- Now compact the soil to remove any high spots.
Step 4
Stake the Forms to keep them in place while you pour the footing for your fire pit base.
- Place the larger of the two concrete forms in the hole you have dug and place the smaller of the two concrete forms on the inside.
- The concrete footing creates a stable base for the pit walls and will keep the sides from cracking as the ground moves over time.
- Mix up Ten x 40kg bags of concrete mix according to the manufacturer’s directions.
- If the forms are not completely round, reposition the stakes slightly.
Step 5
Add the Rebar
- Bend rebar into half-circles for this circle fire pit and tie them together with wire to make a ring.
- Fill in between the forms halfway then press the ring into the concrete for strength and stability, making sure the rebar circle does not touch the sides of the forms.

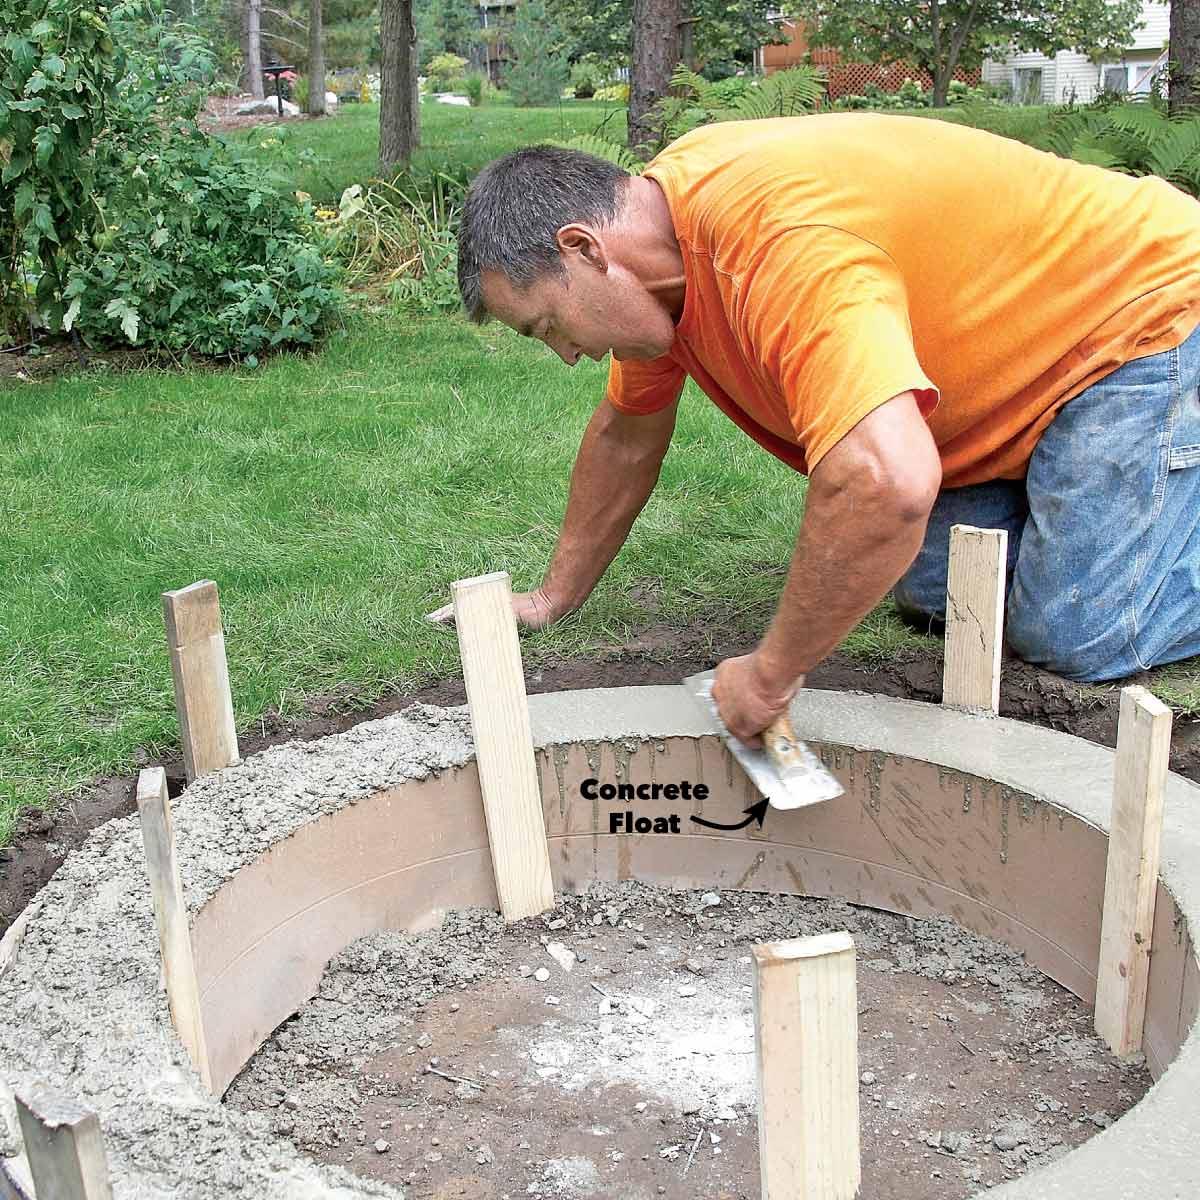
Step 6
Finish the Footing
- Fill the forms to the top with the remaining concrete and tap the cardboard concrete mould tubes gently with a sledgehammer until the concrete mix is level and smooth.
- Let the concrete set overnight then remove the forms.
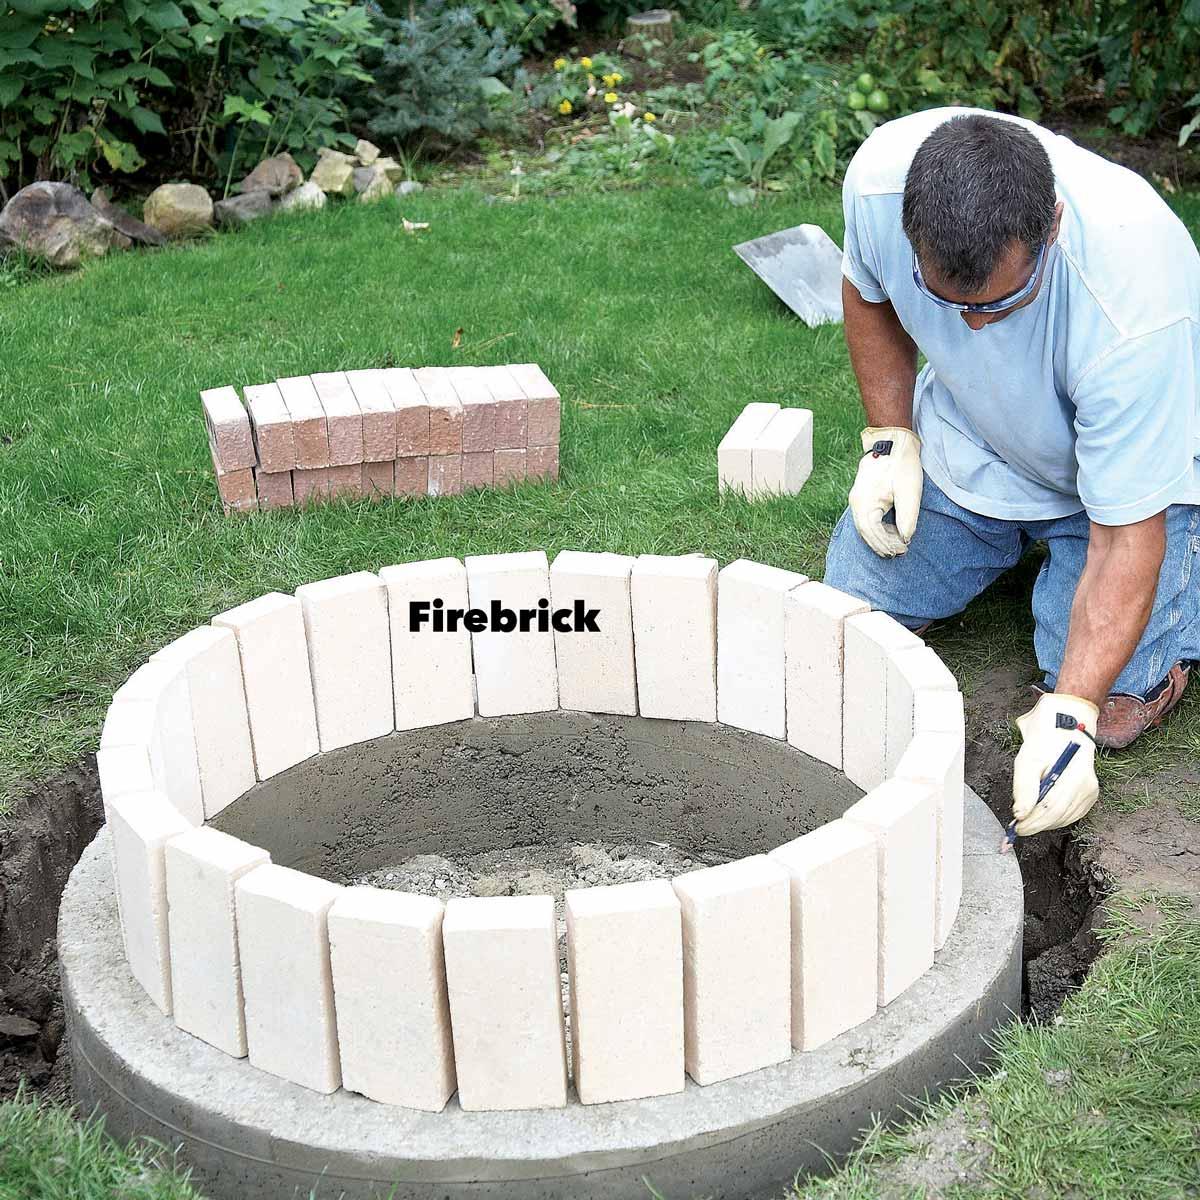
Step 7
Dry-Set the Firebrick Liner
- Your normal clay brick can crack at high temperatures, so we are going to use firebricks to line the inside of the fire pit walls. (also called “refractory” brick as used in pizza ovens) – Firebrick is a dense brick that’s made to withstand high temperatures. They are a bit more expensive but will last for many years.
- You will need 25 firebricks for a 92cm diameter pit.
- Pack the firebricks vertically around the mouth of the firepit, flush with the footing and mark the position behind every brick, with a pencil.
- Firebricks are tougher to split than your normal building bricks. “Soldiering” the brick minimizes the splitting and lets you easily accommodate the curve of the pit.
- You will need to split four firebricks in half, which you’ll place across from one another around the pit to create draw holes, to allow oxygen in for your fire.
- Once you have split your firebricks, dry-set them in place on top of the footing.
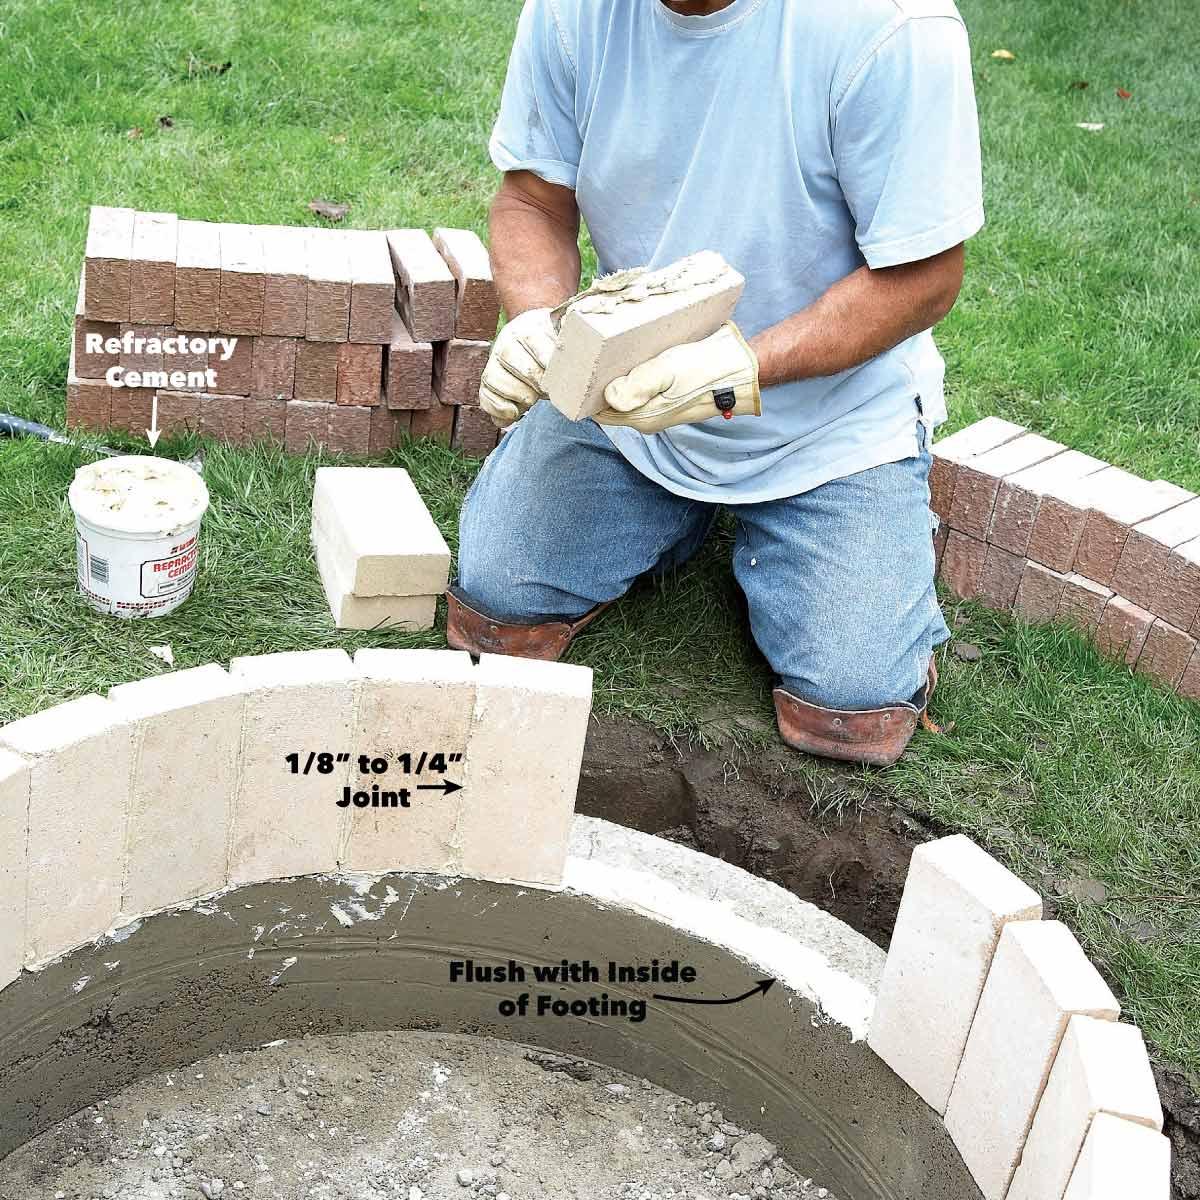
Step 8
Mortar the Firebrick
- We are going to use a 2 Litres of refractory cement to mortar the firebricks, as it can withstand high heat.
- You can buy refractory cement remixed in a bucket and has a thick consistency.
- Work with four bricks at a time and trowel the cement on thin then position your bricks. A margin trowel makes it easier to scoop cement out of the bucket.
- REMEMBER to leave four gaps in four opposite points around the ring to insert your half bricks. These gaps are the “draw holes” that are going to feed your fire with air.
- Continue around the circle making sure that your levels are straight as you go.
Step 9
Create Air Holes
- The top of the half brick must be level with the tops of the firebricks so you will have to apply mortar and prop the half brick into place until the mortar has set.
- Use another brick to hold it up and once it has set pull the loose brick out.

Step 10
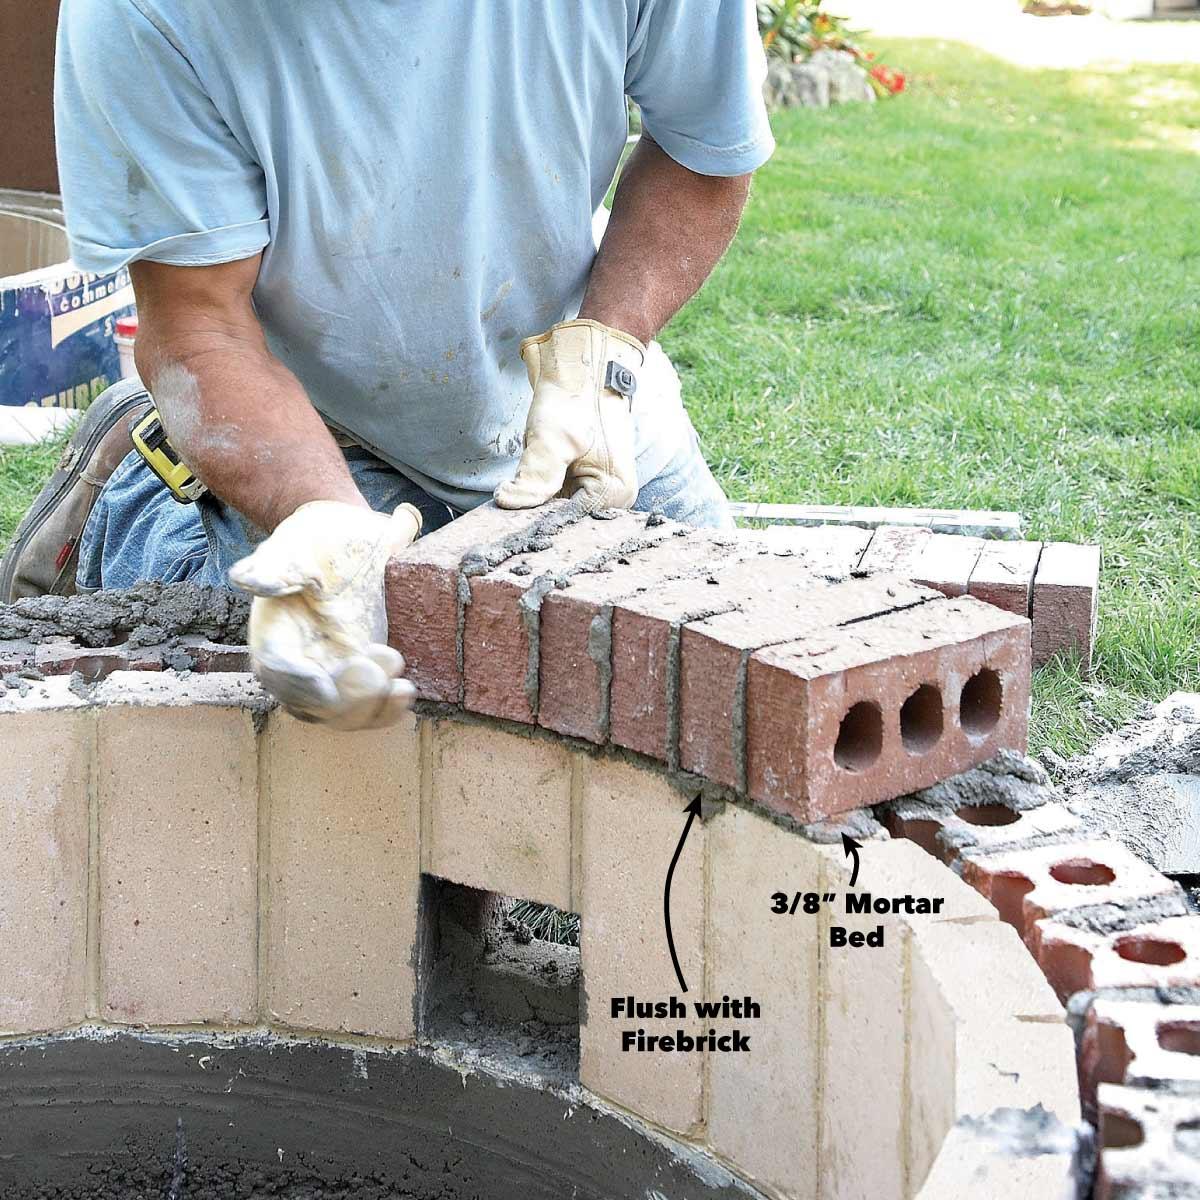
The Outside Walls can now be completed using Face Brick
- We used face brick also known as building bricks to complete the exterior of the fire pit walls.
- You will need 80 face bricks for an outer layer packed horizontally.
- The face bricks can easily be split in half with a brick hammer. Half bricks work better to accommodate the curve of the pit walls.
- Mix your Five x 40kg bags of Type N mortar mix as per manufacturer’s instructions then you are going to lay three courses of face brick and mortar.
- Face bricks are smaller than firebrick so keep in mind that the total height of three stacked face bricks will determine the width of your mortar beds between courses.
- It’s always better to dry-set the face bricks by marking on the fire bricks to be sure that the third course of face brick will be level with the top of the firebrick.
Step 11
How to Split 80 Face Bricks in Half
- Firstly, put your gloves on, you are going to need your hands “in working order” to finish your fire pit😊
- Hold the brick in the palm of your hand, now give it a solid tap in the centre on the outer edge.
- Tap, split, repeat.

Step 12
Set the Face Brick
- Lay a 5cm thick bed of mortar right on top of the footing, to keep your mortar joints a reasonable width between courses.
- Take a 15-minute break to let the mortar set, then smooth off the top.

Step 13
Work in Sections
- Working in sections applying fresh mortar on each section before securing the face brick into place.
- Check the level of each section, tap down the bricks as necessary, making sure the face bricks are aligned with the outer footing.
- Staggering the joints between sections increases the overall strength of the pit wall.

Step 14
Smooth/Strike the Joints
- Once you have finished each section of face brick, use a jointer to smooth the joints before the mortar dries too much.
- If you press your finger into the mortar and an indentation remains, the mortar is ready for smoothing. This will give the outer wall a polished look.
- REMEMBER to leave the draft holes open as you mortar the face bricks into place!

Step 15
Finish Off the Top Lip
- Firstly, Mortar the top of the brick caps.
- Finish the pit with a matching row of regular face brick placed horizontally on their sides.
- You will need about 40 face bricks for this cap.
- Mortar each brick on the outside edge and press it into place.
- For a more sophisticated look, you can use natural stone, to change the look and feel😉
Step 16
Fill Gaps
- Check your joints and add a small amount of mortar to fill any gaps.
- Strike the joints with a concave jointer for a smooth look once all the bricks have been mortared into place, checking the level as you go.

Step 17
Finished DIY Fire Pit
- You will want to wait about a week for the cement to cure properly before making a fire in your new pit.
- Only thing left to do now, invite all your friends over, for the fire pit lighting ceremony next weekend.
- Enjoy and please send us pictures of your masterpiece, we would love to see them!